Key Article Takeaways
- How to navigate the Purchase Orders section in Business Central
- Step-by-step instructions to create and customize a purchase order
- Tips for selecting vendors and adding line items
- How to review, release, and send the final document
- Resources to explore more Business Central functionality
___________________________
Mastering the purchase order process in Microsoft Dynamics 365 Business Central is key to streamlining procurement, reducing errors, and improving vendor relationships. Whether you're just getting started or need a structured refresher, this list will walk you through the core steps of building, reviewing, and sending purchase orders with confidence.
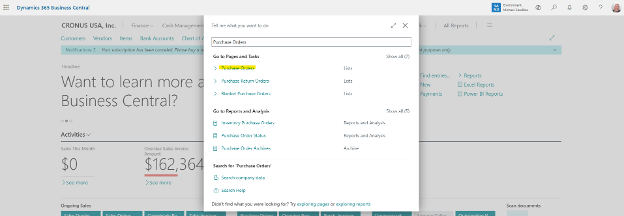
1. Search for the Purchase Orders Page
Start by navigating to the Purchase Orders workspace in Business Central. Use the Tell Me feature (magnifying glass) in the top-right corner and type “Purchase Orders.”
Select “Purchase Orders” to access the Purchase Orders list. From here, you can:
- View existing purchase orders.
- Filter by status (e.g., pending confirmation, upcoming orders, etc.).
- Use Copilot to ask questions like, “Show me all open purchase orders” for quick filtering.
This intuitive interface sets the foundation for a smooth purchasing workflow.
2. Start a New Purchase Order
Click “New” at the top of the screen to create a new order. A blank purchase order card will open.
Your first step is selecting the vendor. Begin typing the vendor's name or number, then choose from the dropdown list. Once selected, Business Central auto-populates key header fields, such as:
- Payment terms
- Shipping method
- Currency
- Location code
This automation helps reduce manual errors and ensures consistency across transactions.
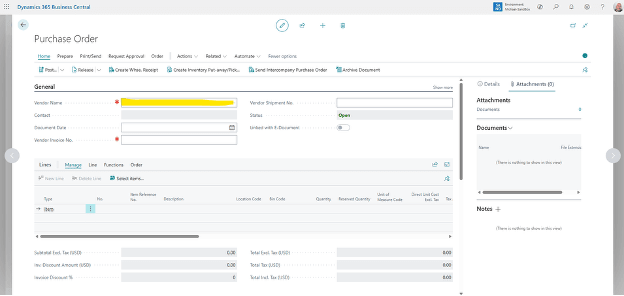
3. Review and Adjust Header Information
Before adding items, take a moment to double-check the prefilled header values. These details are pulled from your vendor’s setup but may need adjustments for specific scenarios, especially if you're managing multiple locations or working with custom terms.
4. Add Line Items to the Order
Scroll down to the lines section to define what you're ordering. Under the Type column, choose the category of your purchase:
- Item
- Resource
- Fixed Asset
For example, if you're purchasing a server, select Item, then input the item number (e.g., Item 1009). Business Central will automatically populate related fields such as description, tax group, and unit cost.
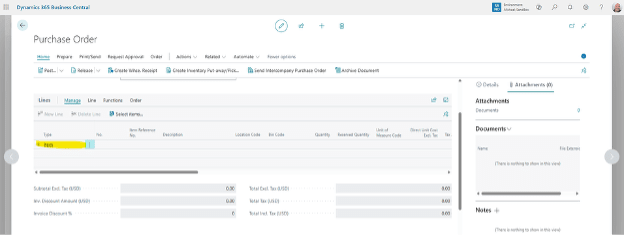
5. Enter Item Details and Quantities
Customize line-level fields based on your specific needs. Common entries include:
- Quantity (e.g., 2 units)
- Unit of measure
- Tax group code
- Location code
Depending on how your system is configured, some fields may be hidden or simplified to streamline the process. Please repeat these steps for each item you're ordering.

6. Review and Finalize the Order
Before submitting or releasing the order, conduct a thorough review:
- Verify vendor information.
- Confirm item quantities and pricing.
- Double-check the location code and payment terms.
This phase is your final opportunity to catch discrepancies and ensure everything aligns with your organization’s procurement policies.
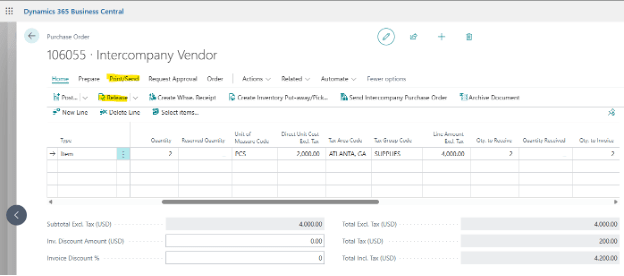
7. Release and Send the Purchase Order
Once you're confident in the details, click “Release” to lock the order and prepare it for approval (if required).
Then, go to the “Print/Send” section and choose how you’d like to deliver the document:
- Send the order directly to the vendor via email.
- Print to generate a physical or PDF copy.
For better recordkeeping, check the box to attach the PDF to the order; it will appear in the Attachments section for easy future reference.
Why This Workflow Matters
Taking a consistent, detail-oriented approach to purchase order creation offers clear benefits:
- Stronger Vendor Communication: Standardized, accurate orders minimize back-and-forth and delays.
- Fewer Errors: Automation reduces the risk of manual entry mistakes.
These are just a few reasons why more organizations rely on Business Central to manage procurement and supply chain operations efficiently.
For more Business Central tips and tricks, refer to our article on the Quote to Cash process in Business Central.
Additional Resources for Deeper Learning
Are you looking to expand your understanding of purchase workflows in Business Central? Start with this helpful guide from Microsoft:
Purchase Order Overview
Prefer to Watch Instead?
If you’d rather follow along with a visual walkthrough, we’ve got you covered. Watch our step-by-step video tutorial on how to create a purchase order in Microsoft Dynamics 365 Business Central, from accessing the purchase order screen to releasing and sending your order.
Watch the video: Creating a Purchase Order in Business Central - LinkedIn Newsletter.mp4
See the process in action and get helpful tips as you go.
Get Help from Dynamics 365 Experts
Western Computer is a trusted Microsoft partner with deep expertise in the Dynamics 365 suite. We work closely with businesses to deliver tailored ERP solutions that align with strategic goals, now and for the future.
Whether you're optimizing purchase orders or deploying a full ERP solution, connect with our team today to discover how we can support your success.